Make these easy-sew garden cushions in 15 minutes
- Rachel Bath
- May 6, 2021
- 3 min read
Gorgeous garden cushions can turn your outdoor space into a sumptuous, stylish haven. Why settle for what you can buy in the shops? Make your own designer cushion covers to suit your taste – it's so easy!
This is by far the simplest way to make an easy-sew DIY cushion cover. And it's reversible too – so you can transform your cushions from boho-chic to smart in seconds.

For this project, I used some woven upholstery fabric. Sturdy fabric like this is brilliant for large cushions as you can be sure they'll hold their shape. If you're on a budget, keep an eye out in large charity shops and flea markets – they're a gold mine for discontinued fabric lines that you can pick up for a bargain!
What I love about woven fabric is that it is often totally reversible – so you get two cushion designs in one. This is my technique for making low-sew reversible cushion covers so that you can make the most of lovely fabric like this. The whole project takes around 15 minutes and literally anyone can make it, whether you have a sewing machine or not.
NOTE: If your fabric is single-sided and you don't want a frayed edge showing, then make sure that you fold your fabric right-side in on step one as you will be turning it out later.
YOU WILL NEED
A cushion pad
Enough fabric to wrap around your cushion like an envelope. So if your cushion is 60 x 60cm, you will need fabric around 150cm x 80cm. Top Tip: Check your fabric width, upholstery fabric is usually around 150cm wide, so you will only need an 80cm length.
Sharp scissors
Dress pins
Ruler and pencil
Needle and thread. (I used a thread in a contrast colour as I wanted it to be visible.)
OR a sewing machine
A cuppa

A NOTE ABOUT SELVEDGES
The edges of fabric are called the selvedge and they don't fray. I like to use them in my designs for two reasons: one, they look pretty; two, they mean less sewing! If you are using the entire width of your fabric then your selvedges will become the edges of your envelope fold. If you have had to cut your fabric and are working with raw edges on all four sides, then you should hem the short ends of your fabric before you start. Do this by folding the edges over by 1cm, fold again, iron flat, pin and sew a simple straight running stitch along the edge.

STEP ONE
Lay your fabric on your surface and fold the top and bottom over to make a gatefold. Tweak the folds to check that it is the same height as your cushion. Use a ruler to check it's exactly right. Now draw a straight line down one side, make it 5cm in from the edge so that you have room to create a fringe.


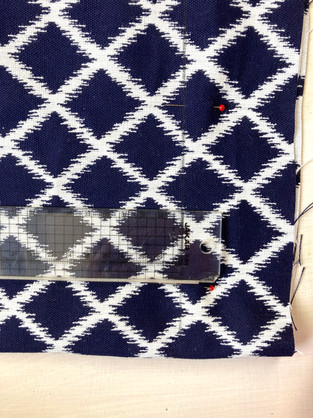
STEP TWO
Add dress pins all the way down, across your seam line, pointing in towards the centre. Measure from the bottom of your first line to make a mark on the other edge, the same width as your cushion. Repeat to measure a mark at the top and then connect the two to draw your second seam line. Add pins as before. Then you're ready to sew.


STEP THREE
Either by hand or using a sewing machine, sew all the way along the seam lines using a small running stitch. If you're hand sewing, use a strong cotton thread. If you're machine sewing, add a zigzag stitch to the outside edge of your running stitch to make a super strong seam – it will stop your cushion splitting and it looks nice too!


STEP FOUR
Trim away any excess fabric so that you have around 3cm of fabric on each side. Pull at the strands of the selvedge to remove some of the warp strands. As you do this, you will start to create a fringe. The is the exact same technique we used as teenagers to fray our denim cut-offs! Don't go too mad with the fringe, about 1cm works well.


STEP FIVE
Your boho-style frayed-edge cushion with contrast stitch is done!! If you suddenly need a more sophisticated feel, or if you have used single-sided fabric, simply turn your cover out so that the frayed edges are inside the cushion.


The beauty of this design is that you don't need to fiddle about with zips or piping and you can repeat the process with any size of cushion. Why not add pops of colour by stitching on strips of ribbon?

Let us know if you have a go and enjoy making this project. And keep your eyes peeled for other DIY ideas to smarten up your outside spaces this summer: we have concrete candles, macramé bunting and hypertufa planter makes to come over the next few weeks - watch this space!
Happy making!


Comments