Mushroom Pincushion Make
- Rachel Bath
- Sep 21, 2020
- 2 min read
We are celebrating autumn today with this lovely little make idea: a needle-felted mushroom pincushion design. If you have never tried needle felting before, this project is great for beginners.

Mini makes like these can be a wonderful way to use up all sorts of colourful scraps of wool.
STEP 1: Twist a small section of wool into a circle shape, roughly 3cm wide. Stab until the fibres felt together, tucking any loose edges in as you go. Turn it over and felt the other side until you have a small disc of felted wool.
STEP 2: Add a twist of orange wool to the centre and gently stab to attach it to the disc. Then press more firmly to push little dots of colour through to the cap of the mushroom..


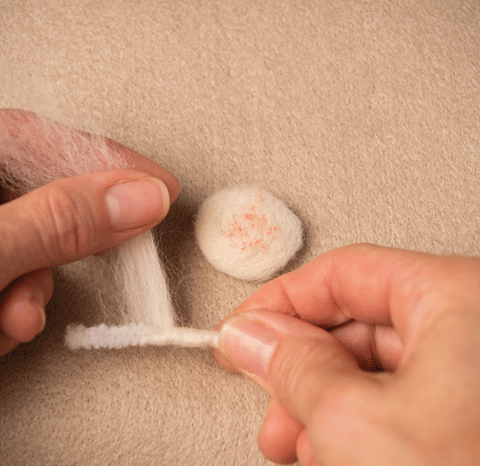


STEP 3: Wind some white wool strands around a bit of pipe cleaner, smoothing the ends so that it clings in place. Leave some fluffy wool at one end.
Step 4: Attach the fluffy ends to the cap with some firm stabs all around the edge. Trim away any fluff from the cap of the mushroom where your needle has gone right through. You can use some sharp scissors for this.
STEP 5: Bunch up some wool scraps and needle felt them together to make a little dome and then needle-felt the mushroom in place by stabbing around the bottom of the stalk. Use scraps of leftover wool in different colours to make other mushrooms and attach them in a little cluster.
Repurpose a mini terracotta flowerpot tray for your dome to sit in. Use hot glue, double-sided tape or velcro patches to stick it in place.
As well as making flat-topped mushrooms, you could have a go at making little toadstools. Just roll up a small piece of red wool, felt it into a little dome, stabbing firmly into the base to make a cup. Attach the stalk in the same way and then felt tiny twists of white wool to add the dots.


Love this Mushroom Pincushion DIY such a creative and fun project! I’ve recently been experimenting with sewing too, especially making velcro patches for backpacks in London, so it’s inspiring to see how small fabric ideas can turn into something really charming. Looking forward to more crafty tutorials like this!