Felted Pom-Pom Star
- Rachel Bath
- Nov 18, 2020
- 2 min read
Updated: Nov 19, 2020
Have you got lots of wool scraps floating about like me? I love making them into mini pom-poms, it keeps my hands busy and my mind clear in the evenings. AND I can whip one up in about two minutes! Have a go, collect them in a little bag somewhere and, when you have 30, you can turn them into a big jolly star decoration like this. Here's how...

You will need:
30 needle-felted pom-poms (see Step 1)
If you want to hang the star, use 0.6mm jewellery wire to reinforce the structure.
If you are making a table decoration or a centrepiece to go around a tea light holder, use a large embroidery needle, embroidery yarn, fine cotton string, fishing wire or something similar to thread the pom-poms together.
STEP 1
MAKE YOUR POM-POMS
Take a small piece of scrap wool and wrap it tightly around your index finger. Pull it off, place
it on a sponge and start to felt it using a needle-felting needle. Turn it all the time as you stab the wool. Make sure to only stab into the centre of the ball so that it stay round.
Repeat to make 30 pom-poms!


STEP 2
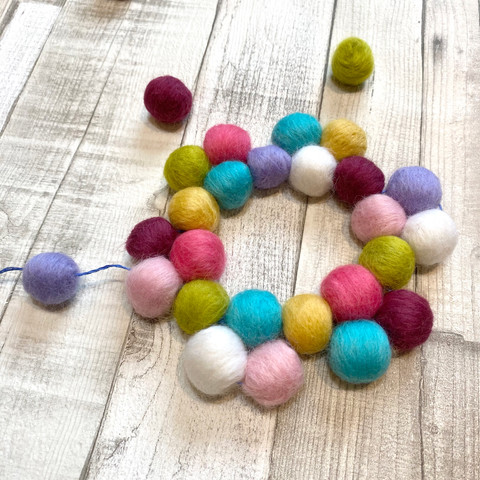
Tie a knot in the end of your thread or fine wire and thread your needle. Push it through your first pom-pom. Thread 12 pom-poms onto the thread and then push the needle through the first pom-pom to make a circle.


STEP 3
Thread two more pom-poms onto the thread. Then push the needle through the third pom-pom along to make the first layer of one of the points of the star. Repeat this all the way around the circle, adding two pom-poms each time, until you end up back where you started.


STEP 4
Push your needle back through your first pom-pom and up through the pom-pom on the next layer. Thread one new pom-pom on and take the needle down through the next three pom-poms, so that your needle comes up at the top of the next star point. Repeat, adding single pom-poms to each point. You might want to plan which pom-pom colours go where before sewing them in place.


STEP 5
When you come to the final point of the star, take your needle back down through the next couple of pom-poms and stitch a knot to secure it. Hide the knot between two pom-poms. Use a loop of thread at one of the points to hang it by.

IDEAS FOR DISPLAYING YOUR DESIGN
Hang it to brighten up a plain wall
Use it at the centre of a long pom-pom garland
Lay it flat in the centre of the table with a glass tealight holder in the central space
Use it as a coaster!
I hope you enjoyed this blog post, do let me know! We have lots of ideas and inspiration for you so please do subscribe at the bottom of the page to receive our monthly emails and members-only discount codes.
Thank you for reading,
Rach x


Comments